Cell and Molecular Biology Lab
Summary Report II
This report contains information from labs three and four. These labs were the continuation of previous weeks and in process of obtaining the same overall goal. The semester long lab is broken down into important milestones that must be accomplished to move to the next step. The milestones are explained in the next paragraph. The semester long project as previously stated in the prior summary may have been unclear. The purpose of this semester long lab is to produce microtubules. Microtubules are those tiny ‘hands’ that come out of centrosomes during meiosis and mitosis. These hands pull sister chromatids to each end of the cell. So, what gives microtubules the ability to do such a thing? Genes. In microtubules, the TUB1 gene. The TUB1 gene is a specific segment of DNA that has the ‘blueprint’ for the cell to make a protein named tubulin. Tubulin is the major component of microtubules. Once a gene is transcribed mRNA can then translate the gene into protein form. But, if you’ve seen pictures of microscopic views of microtubules, you will know that they aren’t exactly easy to see. What is the purpose of producing something you can’t see you ask? Well, science is like magic, and in the best magic there is something that shines. In this project we will make the proteins fluoresce to be able to easily see our product using an additional segment (gene) of DNA that will contain the blueprints to fluoresce this is the GFP gene from aquatic animals.
To bring things into perspective I will break down the intended outcome of each week of lab. The first and seconds weeks involved preparing the yeast genome to be ripped away from the yeast cell and to be amplified. Amplification was needed so we would have enough of the TUB1 gene to successfully make through purification processes and the rest of the future practices. The previous steps were also essential in preparing the TUB1 gene could fit into a plasmid. Plasmids are vectors that have been engineered to be cut open and pasted together with new genetic material. The third and fourth weeks of this lab involved inserting the TUB1 gene into the plasmid and ensuring the insertion was successful through gel electrophoresis. The fifth and sixth labs will involve the purifying the TUB1 product and vector to be inserted into E. coli and cloned through the bacterial processes of reproduction. The seventh and eighth steps will involve preparing the cloned plasmids from E. coli by growing them on specific media. The growths will be tested to ensure the TUB1-GFP plasmid is present through fluorescently based Sanger Sequencing. The ninth and tenth steps will involve preparing the yeast to accept the plasmid product we have created and analyzing the results through gel electrophoresis. The final steps will include Western Blotting of the Tub1-GFP with the use of GFP antibodies; lastly we will visualize the TUB1-GFP as part of the cytoskeleton.
But before we get ahead of ourselves lets understand what is happening in the third and fourth weeks-worth of work. The third week’s objective was to get the TUB1 gene and the plasmid (containing our fluorescent GFP gene as well) that will hold it ready to be cloned/ copied. Since we want the gene IN the plasmid that must be done first through the use of restriction enzyme digest (soon to be explained). But how do we know the procedure was performed correctly, and how do we know if the plasmid took up the gene? Verification processes are a scientist’s best friend. To check the plasmid we again perform gel electrophoresis. After the plasmid contained the TUB1 gene we need thousands of them. These thousands will let them (the plasmid) have a chance to make it through the rest of the procedures throughout the weeks so we cut them out of the gel. A way to make the amount of copies we need is to use bacterial cells. And that is exactly what we do in the future labs. We give the plasmid to E. coli and they make all the copies we need. This process will also be explained and results are soon to come.
Specificity of Steps:
Third Week:
First we need the PCR product from the previous week of lab. We add water and GX1 buffer to that. Remember the GX1 buffer? We used it previously to lower the pH of our mixture. We need it for the same aspects again. To lower the pH of our PCR product + water mixture. This buffer is used as a wash again to separate the PCR DNA. This was spun down at a low speed for one minute and the flow through liquid was removed. Next GE buffer was added. Sound familiar? This is a wash we used in a previous lab as well. We use the GE buffer in this step twice and the sample underwent a faster spin for one minute each time. Since our sample is now stuck in the spin column we centrifuged again but for two minutes to dry the sample and remove any residual ethanol. Once the flow through was removed a new micro centrifuge tube became the new holder for our spin column. TE was then added just like before to neutralize the pH and elute the DNA. So we spun the sample down at a high speed for one minute this broke the DNA free and we discarded the spin column and kept the centrifuge tube.
But I mentioned restriction enzymes were being used. This is when they come into play. Enzymes are much better at cutting DNA than we are so we need them to break covalent bonds in the plasmid DNA to allow room for the TUB1 gene. We prepared two microfuge tubes with water, 10x enzyme buffer, the enzyme Kpnl, and the enzyme BamHI. The first tube was given our PCR product DNA of TUB1 and the second was the Plasmid DNA. These enzymes prefer to work in cold conditions. So set the stage for them the samples were vortexed, spun down, and then incubated at thirty-seven degrees for two hours. During this time the enzymes are looking for their respective areas on our PCR product DNA. These enzymes were specially designed to cut the recognition sequence palindrome leaving the TUB1 alone. Since the gene is left with sticky-ends (ends that were cut) they are looking for a place to stick. Luckily for us, our plasmid had exact room for our TUB1 gene. Again, the enzymes perform best when cold so they were sent to the freezer to do their duty.
Fourth Week:
The objective of this is to purify our plasmid and the TUB1 PCR product. Because of the previous week we have some enzymes in the mix. But how do we separate them you ask? Gel electrophoresis of course. Why? Because, electrophoresis separates molecules by their size. This week is sort and simple. We add the 6x agarose gel loading buffer to the two samples to prepare them for electrophoresis. Thirty microliters of each were loaded onto a gel and ran for about an hour at eighty volts. This is to separate our TUB1 PCR and the Plasmid from the restriction enzymes. Glowing bands in the gel will provide us with a visual identification of our sample results just like the previous gel electrophoresis.
Results:
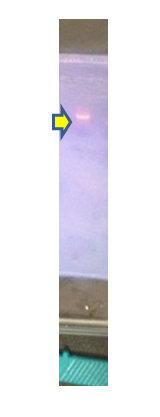
Discussion:
The gel was put under UV light. This was to show us the bands. Only one band is present as indicated with the yellow arrow. In this well we clearly see the plasmid band. We know this is the plasmid because that well was loaded with the plasmid. The well to the right was loaded with the PCR Tub1 product. As you can see there is an absence of band in the lane where we loaded the PCR product. The plasmid band was literally cut from the gel and put into a clean tube to be used in week five. That’s the plasmid we have been working so dearly on so we need to keep it. Since there was no band of PCR product we were given a pre-done sample from our professor.
What happened you ask? Well, the well is our problem. When loading into the well it is important to go just above the well but in the buffer where the gel is residing. When the sample was loaded into the well it was never actually put in the well. It floated away on the top of the gel. Therefore, it could not get stuck in the gel itself when the electricity was turned on.
Why is this a problem you ask? Well, it’s the TUB1 gene, and lots of it. That’s what we worked so hard on and our little enzymes worked so hard to cut to get ready to be inserted into the plasmid. That’s the DNA with our gene of interest TUB1 that codes for the microtubules we keep discussing. We needed this PCR TUB1 for the latter weeks to complete the experiment. For us to continue the future lab work we were given a pre-done sample of the PCR TUB1 that was cut out of a pre-done gel.
